NFT Creation & Minting
NFT Creation & Minting
Section outline
-
-
This is your space to ask, share, and connect.
Got a question? Post it.
Have an idea? Share it.
Want to help someone? Jump in!Keep it respectful, stay on topic, and let’s make this space active and useful for everyone.
-
-
Purpose: Check what you already know about NFTs. Don’t worry – it’s not graded. It just helps us see where you are .
-
-
Welcome to NFT Creation & Minting – Turn Your Ideas into Digital Impact!
This course opens the door to the exciting and purposeful world of Non-Fungible Tokens (NFTs). Built on the fundamentals of blockchain technology, it is specially designed for young changemakers like you — volunteers, creators, students, youth workers, educators, and NGO representatives who want to combine creativity, innovation, and social responsibility.
Through practical, step-by-step guidance on the SINFT platform, you will learn how to design, create, and mint your own NFTs. Whether you want to tell personal stories, showcase artistic visions, or support community-driven causes, you will discover how to transform your ideas into unique digital assets capable of generating support and sustainable funding for meaningful projects.
Beyond the technical skills, the course explores NFT marketplaces, the ethical use of digital technologies, and the importance of audited smart contracts in building trust and transparency.
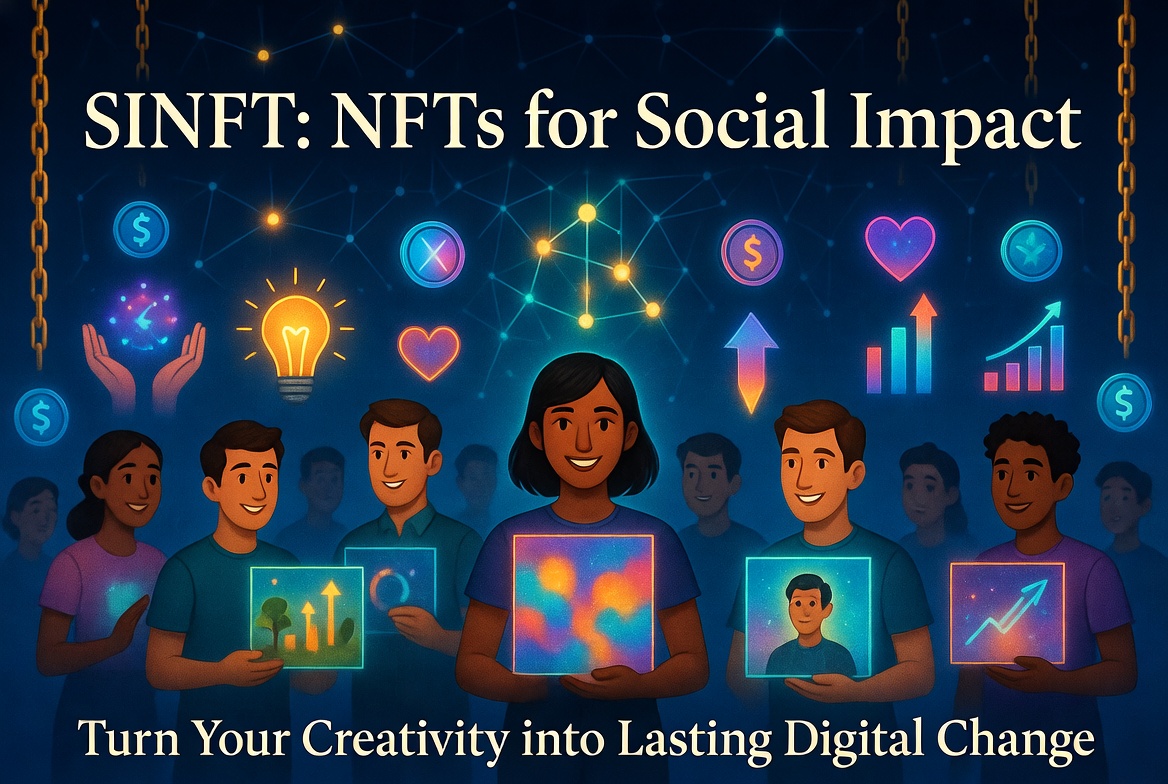
By the end of this course, you will not only master NFT creation but also understand how to use these powerful tools for social innovation and collective progress — directly contributing to the SINFT mission of empowering youth to create real social impact through blockchain and NFTs.
Learning Objectives:
- Explain the core principles of NFTs (tokenization, ownership, and metadata)
- Identify opportunities for social impact through NFTs
- Confidently design and create original NFTs on the SINFT platform
Are you ready to turn your creativity into lasting digital impact? Let's begin!
-
Students mustMark as done
Fungible tokens like cryptocurrencies are interchangeable—each unit is the same as any other. But non-fungible tokens (NFTs) are completely unique, with their own identity, value, and history. That uniqueness lets NFTs power social impact through verifiable ownership, digital certificates, and one‑of‑a‑kind items like charity art or community badges.
-
Students mustMark as done
Every Non-Fungible Token (NFT) is built from three essential technical components that work together to create a unique, verifiable digital asset.
-
Explore real examples on Solscan (Solana) and Etherscan or Polygonscan (EVM chains). Find one NFT and locate its Contract/Mint Address, Token ID, and Metadata URI. Take screenshots and note how these three elements work together.
-
Students mustMark as done
1. Owning an NFT = verified digital receipt of authenticity and ownership of the token on the blockchain. It does not automatically transfer copyright or intellectual property rights of the underlying artwork/content unless explicitly stated in the smart contract or license. Key clarification for creators & NGOs: Always define licensing terms clearly (e.g., personal use, commercial rights, royalties).
-
Students mustMark as done
Metadata – The Digital Storyteller Metadata is the JSON file that gives the NFT its identity:
- Name, description, image URL
- Attributes/traits (rarity, category, social cause tags)
- Creator info, royalty settings
Storage and Permanence Metadata and media files are usually stored off-chain for cost and scalability reasons.
- IPFS (InterPlanetary File System) – most common (content-addressed, decentralized).
- Arweave – permanent storage (“pay once, store forever”) – excellent for long-term social impact projects. SINFT platform handles best-practice storage for you.
-
-
-
🧪 Innovation Labs
Team up. Create art. Mint NFTs. Fund your mission.
🧪What are Labs?
- 🤝 Connect with users who share your goals
- 🎨 Collaborate on artistic expressions for NFTs
- 🌍 Finance your mission via blockchain
🚪Joining a Lab
- 🔍 Explore previously created Labs
- ⭐ Need 'Lab Member' role (complete Intermediate courses)
- 💰 Minimum 6 credits to stack in the Lab
👥 Lab Member or Lab Creator? You can join!🏗️Lab structure
- 📢 Introduction + Announcements
- 📝 Labs Description (all your Labs)
- 🏷️ Sub-title shows Labs you're a member of
💬Communicate & share
- 🗣️ COMMUNICATIONS forum — post opinions, create topics
- 📂 File Sharing — upload shared Lab documents
- 🔒 Subfolders + docs visible only to Lab members
📅Calendar & Wiki
- 📅 See shared events for the Lab
- ➕ Add new shared events
- 📖 Wiki — collectively create NFT ideas
✉️ Private messages — visible only to your Lab members✨Create your own Lab
- 🏆 Complete all Advanced courses → 'Lab Creator' role
- 💸 Creating a Lab costs 12 credits
- ✏️ Edit Lab: name, description, image, tags
- 🔢 Maximum 1 Lab per creator
⚠️ Delete Lab = lose your credits + members' credits-
Students mustMark as done
Explore existing Labs, earn the Lab Member role by finishing all Intermediate courses, stack 6+ credits, and jump in. Lab Creators can join too – your joined Labs appear right in the sub‑title.
-
Students mustMark as done
A forum inside each Lab where you share ideas, ask questions, and reply to teammates. Create your own discussions, choose a category, and edit/delete within 30 minutes. Subscribe to get email notifications on new replies.
-
Students mustMark as done
Upload Lab documents, choose which Lab gets them if you're in multiple teams. Create subfolders to stay organised – files are visible only to Lab members, so share securely.
-
Students mustMark as done
See all shared events, add new ones – just remember to select Event type = Group and pick the correct Lab name. Events are instantly visible to every Lab member.
-
Students mustMark as done
A personal message drawer per Lab shows messages from all your Labs, separated by team. View member lists, send group‑wide announcements, or fire off private messages to individuals. New message notifications pop up immediately on login.
-
Students mustMark as done
This video puts it all together. We've taken everything from the sections above – 🚪 Joining a Lab, 🗣️ Communications, 📂 File Sharing, 📅 Labs Calendar, and 💬 Lab Chats & Private Messages – and packed them into one single, integrated walkthrough.
No jumping between pages. No scattered info. Just a smooth tour of how to collaborate inside SINFT Innovation Labs: from becoming a Lab Member, to sharing files, scheduling events, chatting publicly or privately, and keeping your team aligned.
Hit play to see the full picture – and start turning your mission into NFTs. 🚀
-
-
-
Lesson 3 - Setting Up & Using Digital Wallets -Your Digital Vault (Digital wallets: setting up and using them)
🌐 Welcome to the world of blockchain
With the knowledge you gain here, you'll join the part of the global population that is informed and uses the latest technologies – putting you a few steps ahead of the rest.
In this lesson, you’ll learn the first move into the NFT world: creating a digital (crypto) wallet.
You’ll use it to cover all costs of making and launching your NFTs – and it’s also where your earnings land when NFTs sell.
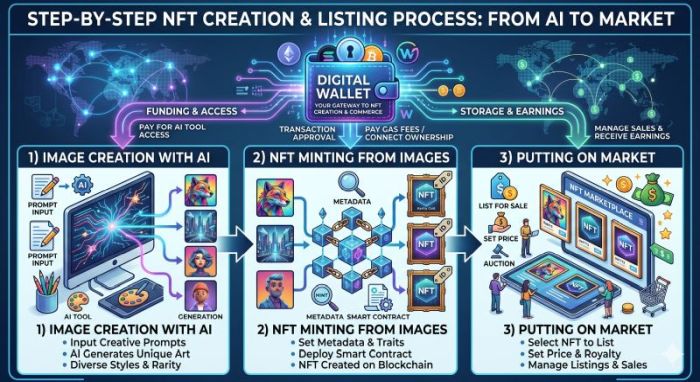
👇 Check out the image below – it shows the NFT creation process and how the wallet plays its part.
-
Students mustMark as done
A blockchain (digital) wallet is your free ticket to the NFT world – you’ll use it to create NFTs, pay for services (we cover the costs 💸), and collect earnings when your art sells. Everything flows back to fund your mission. 🌍
-
Students mustMark as done
Solflare is a powerful, non‑custodial wallet built just for Solana. It’s perfect for earning rewards through staking, managing your NFT collection, and swapping tokens – all with advanced security features. It’s your all‑in‑one tool for exploring the Solana universe.
-
Students mustMark as done
Follow these steps to install, create, and secure your Phantom wallet. ⚠️ Pay extra attention to the secret recovery phrase – it’s the only way to access your funds. No recovery. No support. Keep it safe.
-
-
-
-
🎨 Creating NFTs on SINFT – Your digital art studio
In this lesson, you’ll learn how to bring your NFT ideas to life on the SINFT platform. First, you’ll understand the two ways to access the blockchain part: as a regular user (automatic authentication through the Edu part, where you can see campaigns) or as a Lab creator (access via your Labs, with credits automatically transferred to the NFT portal – no password needed). Once you connect your Solana wallet (Phantom – covered in Lesson 3), a tiny amount of SOL is sent to you to cover transaction fees. Then you land on the Creator Dashboard – your main workspace.
The dashboard has three tabs:
-
Cause – Name your campaign and define how funds will be split. You set a public campaign title and a short description of what buyers are supporting.
-
Generate – Create your artwork. You can upload your own images or use AI to generate art. Just type a description (prompt), optionally click “Enhance Prompt” to make it richer, then click “Generate”. Each generation costs 1 credit. There are limits: max 10 generations for Labs with ≤40 total credits, max 15 for Labs with >40 credits.
-
Mint – After saving your images, you’ll mint them as NFTs and manage your collection (covered in the next lesson).
When you’re happy with the generated or uploaded image, click “Save to Campaign” – it appears in the gallery below, ready for minting.
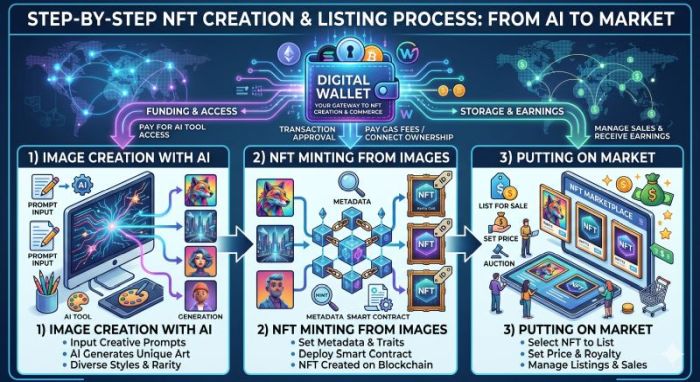
👇 Check out the image below – it shows the NFT creation process and how art creation is first step in this process.
-
Students mustMark as done
In this lesson, you’ll use the SINFT Creator Dashboard to set up your campaign and create artwork. You can upload your own images or generate AI art by writing a prompt – each generation costs 1 credit. Save your favourite images to the campaign gallery, then move on to minting.
-
-
-
-
🖼️ Minting on SINFT – Turn your art into blockchain NFTs
In this lesson, you’ll learn how to mint your artwork as real NFTs on the Solana blockchain. Minting means turning a digital file (image, description, metadata) into a token that lives on‑chain – and SINFT makes it straightforward.
First, you create an on‑chain Collection.
A Collection is a Solana account that groups all NFTs from your campaign together. Click the Mint button to open the Create Collection panel. The collection name is pre‑filled from your campaign title (you can change it). Choose a thumbnail image from your generated artworks – this will represent your collection on marketplaces. Then set the secondary sale royalty – that’s the percentage you earn every time someone resells your NFT later. The default is 5% (you can lower it for better first‑sale chances). Your wallet automatically receives 100% of the funds from sales (you can add extra recipients later). When you’re ready, click Create Collection – a pop‑up confirms success and shows the collection’s blockchain address.Then you mint individual NFTs.
Still on the Mint tab, the NFT Minter panel shows your artwork gallery. Click any image you want to mint. Fill in:-
Name – the NFT title as it appears on‑chain.
-
Description – a short explanation of the piece.
-
(Optional) Cause/mission website link – buyers can learn more.
Click Mint NFT and confirm the transaction in your Phantom wallet. After a few seconds, minting completes: a pop‑up informs you, and you’re automatically returned to your campaign page. The artwork’s status changes to “minted but not listed”, and the platform deducts 2 credits (this covers blockchain fees). Repeat for every artwork you want to mint.
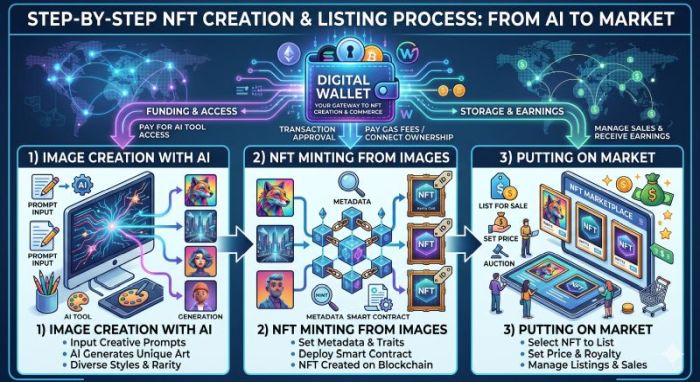
👇 Check out the image below – it shows the NFT creation process and where NFT minitng is positioned.
-
Students mustMark as done
In this lesson, you’ll first create an on‑chain Collection for your campaign – set a name, pick a thumbnail, and choose a resale royalty. Then you’ll mint individual NFTs: select an artwork, add a title and description, confirm the transaction, and pay 2 credits per mint. Your minted NFTs will appear as “minted but not listed” on your campaign page.
-
-
-
-
🛒 NFT Marketplace – List, sell, and fund your mission
After you’ve minted your NFTs, you’re automatically redirected to your campaign panel where all mission information is displayed. To start selling, go to My Listings (top navigation → Creator menu → My Listings). The “Ready to list” section shows all minted, unlisted NFTs.
Click “List for impact” next to an artwork – a listing form opens. Here you can set the price in USD using preset buttons ($10, $25, $50, …) or type your own amount.
⚠️ Important for Lab members
A predefined percentage of each sale will be split equally among the wallets of all Lab members. Therefore, every Lab member must have a connected wallet on the platform before you can list an NFT. Another predefined percentage goes to platform operational costs.After setting the price, click “List NFT” and confirm the transaction in Phantom. The listing costs 2 credits. Once confirmed, the NFT appears live on the marketplace.
Explore the marketplace – navigate to Marketplace to see all listed collections and NFTs. Click any NFT card to view the detail page with price, artist split, and a “Buy” button. Click a cause card to filter only that campaign’s listings.
On the My Listings panel, you can also remove NFTs from the marketplace if needed.
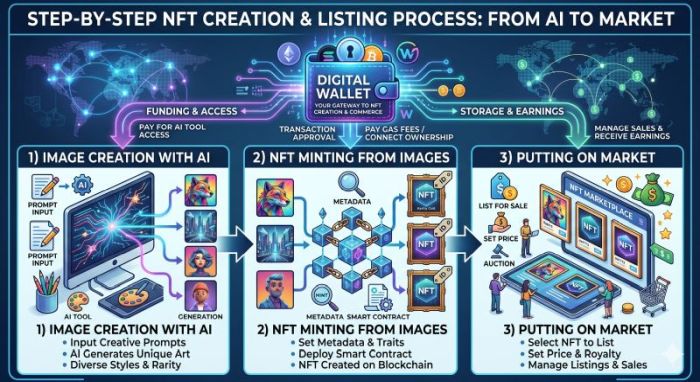
👇 Check out the image below – it shows the NFT creation process and how to put NFTs on marketplace.
-
Students mustMark as done
After minting, go to My Listings and click “List for impact” to set a price in USD. Important: all Lab members must have a connected wallet because sale proceeds are split equally among them. Listing costs 2 credits – then your NFT appears on the marketplace, ready for buyers to discover and support your mission.
-
-
-
📖 Key Readings/Resources
This section has the most important materials connected to the course.
Here you’ll find:
-
📖 Key readings
-
🎥 Helpful videos
-
🔗 Useful links and tools
Use these resources to go deeper, understand the topics better, and level up your knowledge.
If you want to explore more — this is the place to start.
-
-
🎓 COURSE FINAL ASSIGMENT
It is time to bring it all together. As you reach the finish line of this course, take this final assessment to review the key concepts we’ve covered across our entire journey. This ultimate knowledge check will solidify your learning and ensure you are fully equipped to apply these new strategies to build and scale your own project.
Successfully completing this evaluation is your final milestone — it not only validates your hard work but also serves as your official stepping stone into the NFT Innovation Labs, where you will turn theory into real-world action.Upon completion of the course, the student receives the following certificates:
Certificate of Completion / Certificate of Achievement
Confirms that the student has engaged with the course content and completed all required assessments, including passing the final test.
Received Credits: 2
-
✅ COURSE FINAL ASSIGMENT Quiz
Final assessment to complete this course.
Passing grade is required to earn certificate and credits.
Passing grade: 50% and more.
-

Shape the Future.
Mint the Change.